
Pie crust. As a child, it was what I left on the plate. There was just something about the flavor—or lack thereof—that was not enticing. Bland, tough and chewy, I just didn’t get it. Give me the filling or give me a graham cracker crust.
Oh, how I’ve grown! Actually, it’s more like, I finally had good pie crust. Once I learned that the majority of shortening based crust just didn’t do it for my taste buds, I was inspired to make my own, and that’s when the—let’s say healthy—obsession with making my own perfect all-butter pie crust began. When I first decided to give this a go, I considered myself to be a pretty damn good home baker, but had never taken on pie crust. I was confident I would nail it, maybe even a little cocky about my overall skills. My first attempt was not a fail, it tasted alright, but the crust was chewy and definitely not Pinterest worthy. If I had a picture—I don’t—of that first pie, I would share it, I have no shame. That’s the great thing about baking, mistakes can help one master the process. For every crust mistake/disaster, I have figured out why it happened and was able to learn from it. I’m hoping that you can also learn from my mistakes.

For those of you who have screwed it up, added too much or too little water, didn’t chill or overworked the dough, hang in there. With each pie you will figure out the feel of it. It will start to come to you, like any skill, it takes practice.
If this is your first pie, or you don’t make many pies, and it doesn’t come out perfect, don’t get frustrated. Easier said than done, I know, I have had my fair share of freak outs. If you read my instructions and you want to talk about where in the process you struggled, reach out to me, let me know where it went wrong, and we will figure it out. When I was starting the pie thing, I remember having an issue with my dough cracking on the edges as I rolled it out. Frustrated, I watched a bunch of videos, and none of them helped me. Either the pastry chefs were really flipping good at rolling out dough or the video poster was not knowledgeable themselves and they shared a mediocre dough tutorial. I tried some of the things that I read and watched, but what ended up happening was that the more pie dough I made, the more I understood how it should look and feel at different stages. I just got much better at it. Shortening and lard is easier to work with, but I urge you not to give up. All-butter offers a better flavor, and once you start to figure it out you won’t go back. You will have a beautiful crust that tastes damn good. There will be no crust left on any plate.
Alright, this is getting long, and I think by this point you have figured out that I’m a fan of all-butter crust. So let’s get started making this thing. I will also be adding a video tutorial to show my entire process soon. For now, read through my process and the reasons for my methods. Do know, that if you start to do your own research, there are a lot of opinions out there. Some of that information is conflicting. Reading and experimenting is fun so it really is a matter of how far down the rabbit hole do you want to go.
Before we begin, I like to pray to the Pie God. Let me light my shrine and let’s kick some pie crust butt.

Before we start, let’s have a flour discussion! I like to use pastry flour because it makes for a more tender crust—less protein which means less gluten formation. It is trickier to handle. I recommend all-purpose for those who don’t make a lot of pies. I use King Arthur pastry flour, and I find it online. I haven’t found a local store that carries pastry flour so this works well for me. If you don’t use pastry flour, this pie will still be amazing and a crowd favorite. I did a test run of crusts with all-purpose and crusts with pastry flour, there was definitely a difference, and pastry was more tender. I will do a post on flour for pies in the coming weeks. I also want you to know that I am not being sponsored by any products that I endorse. I just like them, and I have found them to be worthy of a shout out.
All-Butter Pie Crust
This is for one 9” pie with a double or lattice crust. If you have an open pie with no top crust (like a crumble topping), cut amounts in half.
- 16 tablespoons (8 ounces) unsalted butter, cold and cubed
- 2 1/2 cups (10 ounces) white pastry flour (intermediate or advanced baker), or use all-purpose flour (10.5 ounces) for those who are getting more comfortable with all-butter crusts. Note: if you can’t get pastry flour, mix all-purpose flour with cake flour (1 part cake flour, 2 parts all-purpose) Here is a short video with some additional info.
- 1 teaspoon salt
- 4-10 tablespoons ice water
- 2 tablespoon sugar (optional, personal preference)
It starts with very simple ingredients—deceivingly simple—flour, salt, butter and water. I add sugar because I just like it better. I seem to go back and forth on using a pastry blender versus a food processor for incorporating the butter, it just depends on my mood so I will discuss the use of both.
Pastry Blender to Incorporate Butter
First, let me start with a suggestion. Don’t buy a cheap pastry blender. When I first started making pies, I bought one from my local grocery store and paid the price. After two uses, the handle kept falling apart, and I would have to incorporate the butter while trying to keep the handle together. Now I use a Spring Chef Dough Blender, and it is so much better. If you skipped the part above where I talk about flour, I am not being sponsored by any products that I endorse. I just like them, and I have found them to be worthy of a shout out.

1.) Add your flour to a medium size bowl (for true consistency, I weigh my flour and butter out, and I recommend that you do as well). If you don’t have a kitchen scale, no biggie, it will still be delicious, but you can find small ones for a reasonable price. If you are going to use measuring cups for the flour, you don’t want to pack the flour in or scoop your measuring cup into the flour. Instead, take a spoon to add the flour to the cup and a knife to sweep across removing the excess flour.
2.) Whisk in the salt and sugar (if you decide to add sugar) until well incorporated.
3.) Cut your cold butter into cubes. It is important that your butter is chilled, cold butter stops gluten formation (I’m going to warn you now, I’m gonna talk a lot about gluten in this post). Gluten is so necessary and so frustrating. You need that perfect balance of the dough staying together without too much gluten making your crust tough. If the butter is warm it will incorporate and melt into the flour, and then you won’t have those lovely flour coated chunks of butter that make for a beautiful flaky crust. There is nothing more infuriating to me than working my booty off to make a beautiful pie and my first bite is tough and chewy. A tough crust truly is my nemesis.
Another tip, to keep things cold, I like to chill my bowl and pastry blender tool as well (I just put them in the freezer for a few minutes).

4.) Now it is time to cut the butter in using the pastry blender.

Spread the butter chunks throughout the flour mixture. Press the pastry blender down into the chunks and turn the blender slightly. I continue to do this until the flour covered butter chunks are the right consistency. I like to have a mealy consistency with lima bean size chunks for my pies, I find it to be a good flaky crust when the pie is fully baked.
Using a Food Processor Instead to Incorporate Butter
This means that I will now have the food processor to clean instead of just a medium size bowl, but a food processor is consistent and fast. However, you don’t get the same feel for the dough as a pastry blender. In the food processor add the flour, salt and sugar. Pulse to incorporate. Add cold, cubed butter and pulse until mealy, lima bean sized pieces. Once it is the right consistency, move mixture out of the food processor and into a medium-sized bowl.
Stir in Ice Water
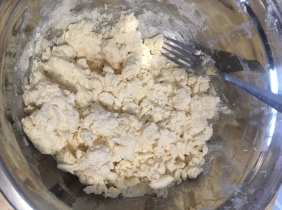
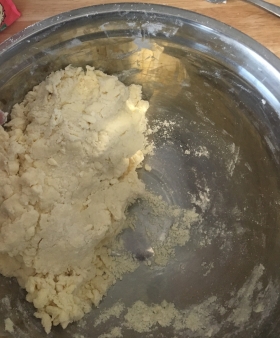
Using a fork or spatula—don’t use your hands, it will warm up the butter— stir in four tablespoons of ice water. From here, add ice water one tablespoon at a time. Dough will start to come together but still be crumbly and should hold together when you squeeze it, but not be overly moist (too much water aids in gluten development—nemesis!) which causes a tough crust. This is why people have so many issues working with an all-butter crust, a great dough is barely being held together by the water, and can be hard to handle. Allowing it to chill in the refrigerator is what allows for the gluten to rest and for the dough to be rolled out more easily. There really is no need to add vodka or apple cider vinegar. Just practice it a bit, get the feel for it, don’t be intimidated by it. Don’t knead the dough—overworking the dough will also cause the butter to warm and gluten formation. Use the fork or spatula to gently stir the water in. You will see when it starts to stick together. Next, form the dough into a ball.
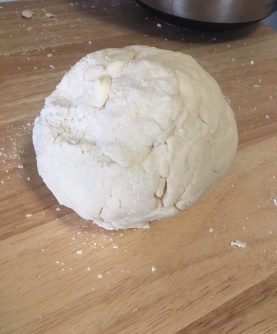
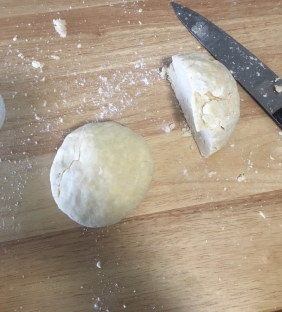
Form Into Disks and Chill in the Refrigerator
Cut dough ball in half. Form each half into a flat, even disk, cover in plastic wrap and chill in the fridge for at least two hours and up to 2 days (you can also freeze in a freezer bag for up to 3 months). The longer you can let the dough chill and rest ,the better. I like to make my dough the night before and let it chill overnight. It really does make a big difference when the crust bakes, it is very flaky and holds its shape better without shrinking.
If you are new to pies you will learn quickly that a pie can go into the oven looking gorgeous, but come out looking like a blob. You work hard to make a beautiful crimped edge, and when it comes out it looks like crap!! Or the side slumps down!! I have freaked out about this, and I’ve learned that not overworking and letting the dough rest in the fridge is key. Later I will talk about freezing the dough before putting into a hot oven to help with this as well.

Rolling out the dough
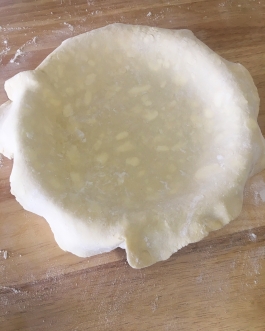
Sprinkle the counter and dust a rolling pin and your hands with flour. Place your chilled dough disk on the flour covered counter (if your dough warms up and becomes too sticky, even with flour, you can chill it in the fridge for an additional 15-20 minutes). Starting from the center of your disk, apply even, gentle pressure, and roll away from you.
Get a good rolling pin. I use a JK Adams 19-inch rolling dowel. Wirecutter, a New York Times Company, did reviews on rolling pins, and had this as one of their best picks. They mention it was not as good at rolling out circular dough, but I have no problems with that. This tool made a huge difference for me. When I first started doing this, I had a small pin with handles. It sucked. Don’t be like me, get a decent rolling pin, it will make your life so much easier.
Don’t roll back and forth in the same spot—instead roll outward and then turn dough clockwise. If you roll in the same spot you will most likely have uneven dough and gluten will develop. Again, gluten development causes your crust to get tough. Did I mention that tough crust is my nemesis? Continue to roll and then turn dough, using more flour when needed and flipping multiple times along the way, until you have an 11 inch diameter. Place the dough into a 9 inch pie pan. If your recipe calls for a blind bake—that means prebake—crust (scroll down for blind bake instructions), prick the bottom of the pie dough with a fork. This will allow the steam to escape and will keep the bottom from puffing up while in the oven. Put the pie pan in the freezer for at least 20 minutes. This will also keep your dough from slouching, and is very important.

If your dough is cracking on the edges—the dough may not have enough water (like I said before, this is a balance, you need enough to keep the dough together). The best way to add more water is with a spray bottle or a dab of water and work with your fingers to fix the crack (don’t overwork). Sometimes the dough is too cold, let it sit on the counter for 5 minutes before rolling. If my dough cracks I just blend it back together before cracks can get too big, it doesn’t freak me out like it did in the beginning.
Crust Decor
There are so many creative things you can do to make your crust beautiful. My next post will be a tutorial on crust decor. Roll out your second disk of dough and have some fun! I love braiding the crust, traditional crimping is always gorgeous, leaf or flower cutouts, and the list goes on and on. You can be as creative as you want! If you are baking berry pies, a double crust is nice because it keeps the moisture from evaporating out, but make it yours. It is important that you move the pie pan with dough into the freezer for at least 20 minutes before putting in the oven on a hot cookie sheet. This is what will help the crust keep its shape and size while baking.


Blind Baking
Blind baking is essential to many pies, and a soggy crust is just as frustrating as a tough crust. Blind baking helps to take care of sogginess or an under baked crust by partially or fully baking it before adding the filling. Some dessert pies, like French Silk, call for a fully baked crust before adding the filling, and some pies need a partial blind bake before the filling is added. With a custard pie, the moisture in the filling can make the crust soggy before it has time to actually bake. Blind baking the crust until it’s half-baked helps the crust stay firm. The other nice thing is that you can blind bake the day before—up to 24 hours—before adding the filling. It should be stored at room temperature (no fridge!). Just cover loosely and leave on your counter.
1.) Preheat oven, 425 degrees F. with a cookie sheet in the oven.
2.) At this point you should have your dough in the pan, and it should be coming out of the freezer (you should have pricked the dough with a fork—also called docking— before putting in the freezer). It is important that after rolling out the dough and putting it in the pie pan that you let the dough rest in the freezer for at least 20 minutes. This helps the dough keep its shape and will also help with it slumping or shrinking too much. I know I am repeating myself, but it is only because this is an important step. Line the dough with foil. I use foil because I can also use it as a pie shield for the crust. It will stop the crust from getting too much color on the blind bake, especially for pies like chocolate cream or french silk, where you are looking for a lighter golden crust.
3.) Fill the foil with pie weights, dried beans or my favorite, granulated sugar. Folks even use pennies. You need weight so that the bottom of the crust won’t puff up too much and so the crust does not slump. I bought pie weights, but you need a lot of them, and I prefer sugar because I can fill the pan to the top, and I think this helps even more with keeping the crust from shrinking/slumping.
4.) Transfer the crust to the oven and place on the hot cookie sheet. Bake the crust for 15 minutes.
5.) Remove the foil and weights, then return it to the oven for 5-15 minutes. For a partially baked crust you want it to still be a paler color on the bottom, compared to a fully baked crust which should be golden brown. You will leave a fully baked crust in for longer than the partial.
FRUIT PIES AND POTENTIAL SOGGY BOTTOM PROBLEMS

Bake Pie on a Cookie Sheet at Higher Temp to Stop a Soggy Crust
When I bake my apple or berry pies I choose not to do a blind bake. Instead, to stop the dreaded soggy bottom, I take my pie plate from the freezer, add my filling and then put the pie directly onto a hot cookie sheet in a very hot oven, 425 degrees F. After 20 minutes, I lower the oven temp to 375 degree F. For my berry pie, I take my pie plate out of the freezer, add the filling, add my top crust, and then freeze the whole pie for at least 20 minutes before putting on the hot cookie sheet.
This really works! The hot cookie sheet bakes the bottom of the pie crust and stops that soggy bottom. I bake all pies on a hot cookie sheet, not just fruit pies. Cooks Illustrated did a segment on this too.
That’s it for now! I will be doing a post on decorative crust soon, and I will be adding a video to this as well.

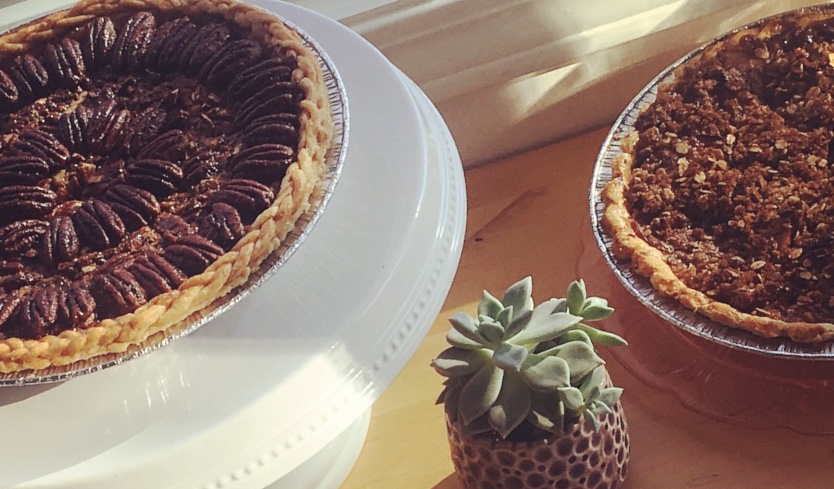
Pingback: Bourbon, Spiced Pecan Pie Recipe – Lakebilly Pies
Pingback: Cherry Pie That’ll Kill Ya – Lakebilly Pies
Pingback: Key Lime Pie Recipe – Lakebilly Pies